Configuring Devices
Introduction
KNX devices are not configured by default. They need to actively be configured using the applications that are provided below. These applications use the serial number of the device to find it on the network and communicate with it.
Tools
The tools listed below are a set of applications that can perform tasks to interact with a KNX IoT Point API Device. Typical interactions are:
- Searching for a device or multiple devices.
- Configuring a device.
- Issuing s-mode messages.
- Listening to s-mode messages.
- Resetting a device.
Each application has the -h option to show the command line parameters.
All applications typically require an argument indicating which device the command is issued to. This can be done using the -sn option, followed by the serial number of the device.
Downloading the Tools
The tools can be downloaded from the GitLab release page of the KNX IoT Stack. You will need to login using the username and password found here.
The files to download and unzip are:
- app_release_no_security_win32.zip (applications with security disabled)
list_devices
Application to list devices, issuing:
- Discovery of device with internal address using query : if=urn:knx:ia.[ia]
- Discovery of device in programming mode using query : if=urn:knx:if.pm
- Discovery of device with a serial_number using query : ep=urn:knx:sn.[serial_number]
- Discovery of device using a group_address using query : d=urn:knx:g.s.[group_address]
- Discovery with query : rt=urn:knx:dpa.*
To show all options:
list_devices -h
programming_mode
Application to put a specific device (via serial_number) in programming mode.
To show all options:
programming_mode -h
Note: to discover a device in programming mode, use list_devices.
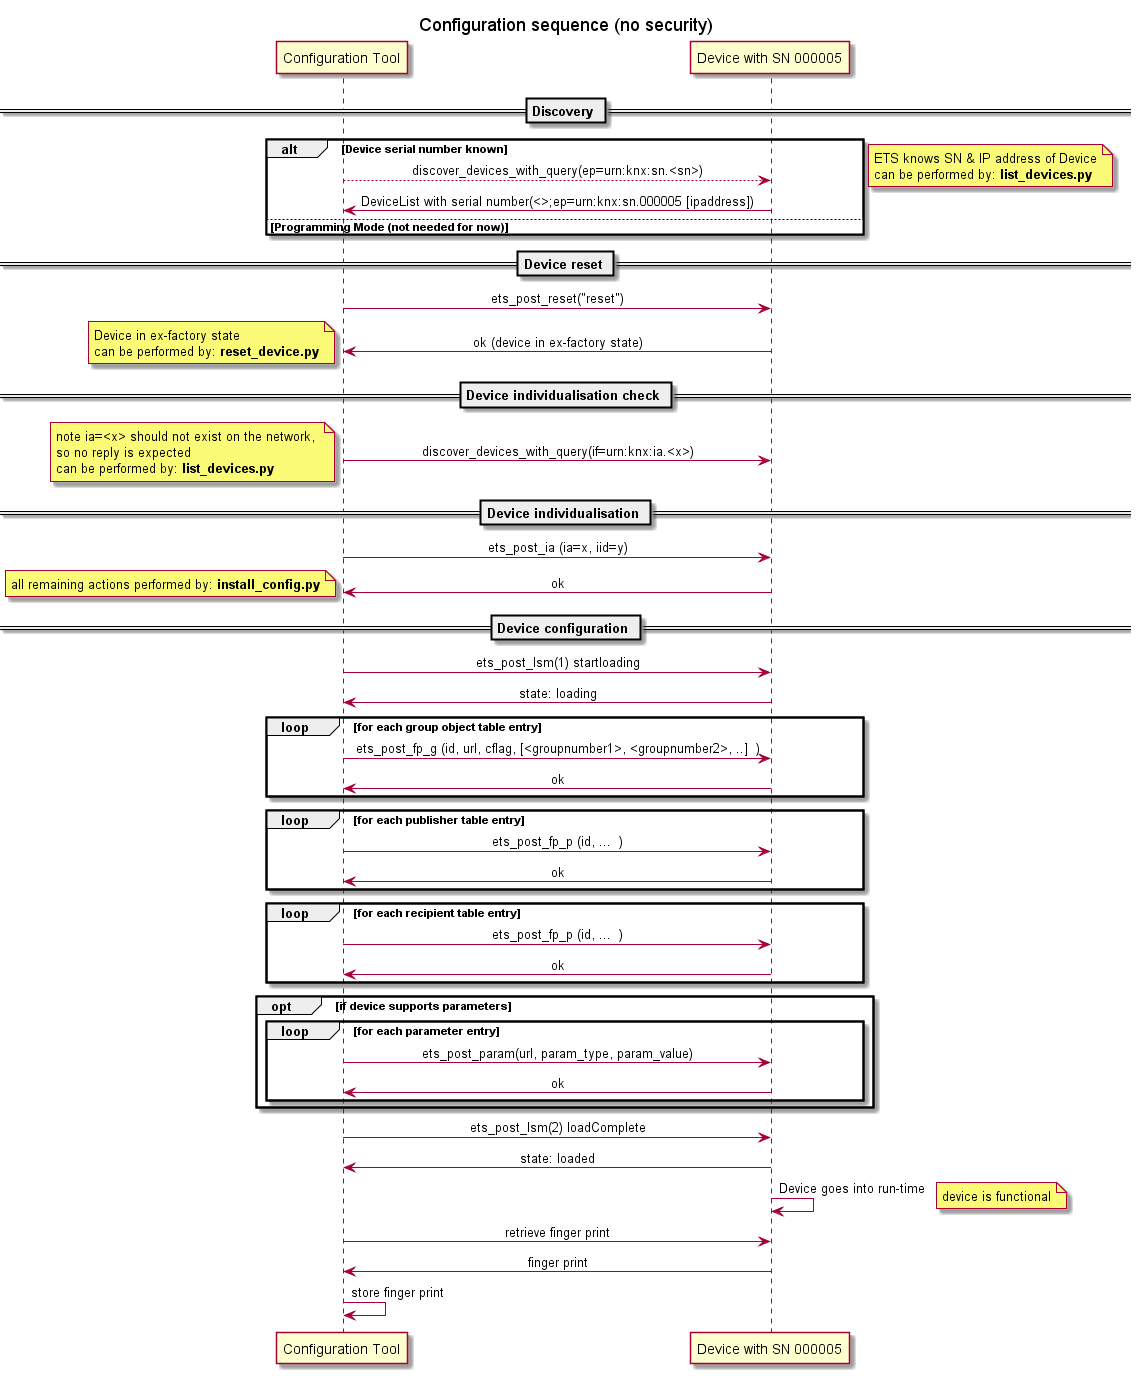
install_config
Application to configure devices.
The application will issue the following commands:
- Discover a device with a specific serial number.
- Performing device individualization by setting the:
- internal address (ia)
- installation id (iid)
- Setting the device in
loadingstate- configure Group Object Table
- configure the Publisher Table
- configure the Recipient Table
- configure parameters
- Set the device in
loadedstate
- Retrieve the fingerprint
The flow is depicted in the following diagram:
To show all options:
install_config -h
Example to configure:
- Device with serial number
00FA10010700 - Setting the internal adress on 1
- Using the LSAB_config.json input file for all other configurations
./install_config.exe -sn 00FA10010700 -ia 1 -file LSAB_config.json
The configuration file
The configuration file is a json formatted file containing the following configuration data:
- installation id: Key = “iid”
- individual address: Key = “ia”
- group object table: Key = “groupobject”
- parameter (table): Key = “memparameter”
- recipient table: Key = “recipient”
- publisher table: Key = “publisher”
- access token table: Key = “auth”
- parameter (table): Key = “memparameter”
Example config data for ia and idd:
{
  "ia": 7,
  "iid": 5,
....
}
The contents of the tables are items in an array. The items have the json keys represented as strings (e.g. “id” instead of 0), which the application converts into integer keys. Then the contents are encoded with CBOR.
Group object table
The group object table contains the array of json objects for a Group Object Table entry.
The group object table contains the following json tags:
- “id” : identifier in the group object table (used internally for manipulation/parsing purposes)
- “href” : the href of the point api url
- “ga”: the array of group addresses
- “cflags” : the communication flags (as strings), the cflags array will be converted into the bit flags.
| JSON string key | JSON integer key |
|---|---|
| “id” | 0 |
| “href” | 11 |
| “ga” | 7 |
| “cflags” | 8 |
Let’s consider the following simple two-device KNX IoT installation:
- An actuator device having two LEDs, which should have the ability to turn either LED On/Off individually or together, based on a received message from a sensor.
- A sensor which should be able to instruct the actuator to turn either LED On/Off individually or together.s
In order to achieve the first requirement, the actuator has to:
- Register two resources, one for each LED. In this example, the resources will be “href = p/o_1_1” and “href = p/o_1_2”.
- Register three group addresses:
- One for turning on both LEDs at once, “ga = 2305”
- One for turning on LED1 by itself, “ga = 2306”
- One for turning on LED2 by itself, “ga = 2307”
- Add the resources to the appropriate group addresses:
- Both “p/o_1_1” and “p/o_1_2” are added to group address 2305, so that both LEDs can be toggled together.
- “p/o_1_1” is added to group address 2306, so it can be toggled individually.
- “p/o_1_2” is added to group addresss 2307, so it can be toggled individually.
- Indicate the method of interaction (read/write/transmit) with the resources:
- For the resources registered with group address 2305, we want to allow other devices (e.g. a sensor) to “write” to the resource. This is done with “cflag = w”.
- For the resources registered with group address 2306 and 2307, we want to allow other devices (e.g. a sensor) to both “write” to and “read” the value from the resource. This is done by adding both “cflag = w” and “cflag = r”.
All this information is organized and stored in the group object table for the actuator, as shown below:
{
....
"groupobject" : [
    { "id": 1, "href": "p/o_1_1", "ga" :[2305], "cflag" : ["w"] },
    { "id": 2, "href": "p/o_1_2", "ga" :[2305], "cflag" : ["w"] },
    { "id": 3, "href": "p/o_1_1", "ga" :[2306], "cflag" : ["w", "r"] },
    { "id": 4, "href": "p/o_1_2", "ga" :[2307], "cflag" : ["w", "r] }
    ]
....
}
To achieve the second requirement of the installation, the sensor has to:
- Register three resources:
- One for turning on both LEDs together, “href = p/o_1_1”.
- One for turning on LED1 by itself, “href = p/o_1_2”.
- One for turning on LED2 by itself, “href = p/o_1_3”.
- Note: One point of possible confusion is that for the actuatory, resource “p/o_1_1” represents LED1, whereas for the sensor, it represents the action of turning on both LEDs. The confusion stems from the fact that the same “href” value is used to represent different things. In reality, those “href” values are not connected in any way, despite having the same value. The href values are only relevant within the scope of a single device. In fact, we could change the href value to something entirely different.
- Add the resources to the appropriate group addresses:
- “p/o_1_1” is added to the group address which was registered in the actuator to turn on both LEDs at once. That is group address 2305.
- “p/o_1_2” is added to the group address which was registered in the actuator to turn on LED1 by itself. That is group address 2306.
- “p/o_1_3” is added to the group address which was registered in the actuator to turn on LED2 by itself. That is group address 2307.
- Note: Unlike the href values which are device-specific, the group addresses need to match accross devices, because if a message is sent for a specific group address, then all the devices which receive the message will take some action on the resources that they have registered at that group address.
- Indicate the method of interaction (read/write/transmit) with the resources:
- In this case, we want all the resources to be transmit-only, meaning that the sensor will transmit information about those resources. This is done with “cflag = t”. The lack of flags “w” and “r” means that other devices cannot read from or write to the resources registered by the sensor device.
All this information is organized and stored in the group object table for the sensor, as shown below:
	....
	"groupobject" : [
		{ "id": 1, "href": "p/o_1_1", "ga" :[2305], "cflag" : ["t"] },
		{ "id": 2, "href": "p/o_1_2", "ga" :[2306], "cflag" : ["t"] },
		{ "id": 3, "href": "p/o_1_3", "ga" :[2307], "cflag" : ["t"] }
    ]
	....
	}
Some more information about the “cflag”s:
- R-flag: The device will for this object react to a “read” s-mode message by sending a response s-mode message back.
- W-flag: The device will for this object react to a “write” s-mode message by overwriting the object value. For a switch actuator this e.g. means that a relay representing this object will be opened or closed.
- T-flag: The device will for this object transmit any updated object value, i.e. it will send a “write” s-mode message.
Example scenario based on installation explained above: If the sensor wants to make the actuator toggle both its LEDs at once, then it would send an “s-mode” message to the actuator on group address 2305, with the “w” flag (which automatically gets set in the s-mode message when the resource is registered with flag “t”). When the actuator receives the message, it checks its group object table for any resources registered with group address 2305, and finds that it has resources “p/o_1_1” and “p/o_1_2”, corresponding to each LED. As a result, it toggles both LEDs at once.
If the sensor had sent a message with group address 2306, then the actuator would turn on LED1 individually.
Publisher table
The publisher table contains the array of json objects for a Publisher entry. This is the information of the sending side. Note that the ia (and path) need to be defined or the url. If the ia is defined and the path is not there, the path will have the default value “.knx”.
- “id”: identifier in the publisher table
- “ia” : internal address
- “ga” : the array of group addresses
- “url” : the unicast url
- “iid” : the installation id
- “grpid”: the (multicast) group id
| JSON string key | JSON integer key |
|---|---|
| “id” | 0 |
| “ia” | 12 |
| “ga” | 7 |
| “url” | 11 |
| “iid” | 26 |
| “grpid” | 13 |
Example:
{
....
"publisher" : [
      {
         "id": "1",
         "ia": 5,
         "ga":[2305, 2401],
         "path": ".knx",
     },
     {
         "id": "1",
         "iid": 5,
         "grpid": 88,
         "ga":[2305, 2401]
     },
     {
         "id": "2",
         "url": "coap://<IP multicast, unicast address or fqdn>/<path>",
         "ga": [2305, 2306, 2307, 2308]
      }]
....
}
The entry mentioning grpid is used for the s-mode communication. The entry describes which grpid in the multicast will be used for which groups. To simplify the installation, all group addresses can be mapped to a single grpid. Note that the publisher side is the side that creates the multicast address for receiving.
Recipient table
The recipient table contains the array of json objects for recipeint entries. Note that the ia (and path) needs to be defined or the url. If the ia is defined and the path is not there, the path will have the default value “.knx”.
- “id”: identifier in the publisher table
- “ia” : internal address
- “ga” : the array of group addresses
- “url” : the unicast url
- “iid” : the installation id
- “grpid”: the (multicast) group id
Note that the table entries are the same as for the publisher table.
| JSON string key | JSON integer key |
|---|---|
| “id” | 0 |
| “ia” | 12 |
| “ga” | 7 |
| “url” | 11 |
| “iid” | 26 |
| “grpid” | 13 |
Example:
....
{
"recipient" : [
    {
        "id": "1", ia": 5, "ga":[2305, 2401], "path": ".knx",
    },
    {
        "id": "2","url": "coap://<IP multicast, unicast address or fqdn>/<path>",
        "ga": [2305, 2306, 2307, 2308]
      }
          {
        "id": "1", ia": 5, "ga":[2305, 2401], "path": ".knx",
    },
    {
         "id": "1",
         "iid": 5,
         "grpid": 88,
         "ga":[1, 2, 3, 4, 5, 6, 7, 8]
      }
    ]
....
}
Access token table
The access token table contains the array of json objects for auth/at entries.
- “id” : identifier of the entry
- “profile” : oscore (2)
- “scope” : either list of integers for group scope or list of access (if) scopes
The oscore information is layered: cnf & osc as json objects:
- cnf(8):osc(4):id(0) : the oscore identifier
- cnf(8):osc(4):ms(2) : the master secret (32 bytes)
- cnf(8):osc(4):contextId(6) : the OSCORE context id
| JSON string key | JSON integer key |
|---|---|
| “id” | 0 |
| “profile” | 12 |
| “scope” | 9 |
| “url” | 11 |
| “cnf” | 8 |
| “osc” | 4 |
| “ms” | 2 |
| “contextId” | 6 |
Example:
{
....
"auth" : [
  {
     "id": "id1",
     "aud": "xx",
     "profile": 2,
     "scope": [ 1, 2 , 3 ],
     "cnf": {"osc" : { "id": "osc_1",  "ms" : "ms_1" }}
  },
  {
      "id": "id2",
      "aud": "yyy",
      "profile": 2,
      "scope": [ 4],
      "cnf": {"osc" : { "id": "osc_2", "ms" : "ms_2" }}
  },
  {
      "id": "id3",
      "aud": "yyy",
      "profile": 2,
      "scope": [ "if.sec" ],
      "cnf": {"osc" : { "id": "osc_3", "ms" : "ms_2" }}
  }
  ]
....
}
Parameters
The parameters can be via the resource uri /p.
The parameter information:
- “value”: The value of the data (which will be CBOR-encoded)
- “href”: The href of the endpoint for the parameter
| JSON string key | JSON integer key |
|---|---|
| “value” | 1 |
| “href” | 11 |
Example:
{
....
 "memparameter": [{
            "href": "/p/P-1/R-1",
            "value": "true"
        }, {
            "href": "/p/P-2/R-2",
            "value": "false"
        }, {
            "href": "/p/MD-2/M-1/MI-1/P-1/R-1",
            "value": "17"
        }, {
            "href": "/p/MD-2/M-1/MI-1/P-2/R-2",
            "value": "1"
        }, {
            "href": "/p/MD-2/M-2/MI-1/P-1/R-1",
            "value": "17"
        }, {
            "href": "/p/MD-2/M-2/MI-1/P-1/R-4",
            "value": "17"
        }, {
            "href": "/p/MD-2/M-2/MI-1/P-1/R-3",
            "value": "13.333"
        }
 ]
....
}
s-mode
Application to issue an s-mode command.
- has option to set the various values in the command.
To show all options:
s-mode -h
sniffer-s-mode
Application to listen to s-mode commands.
- has option to set iid and max group address
To show all options:
sniffer-s-mode -h
reset_device
Application to reset the device. The application will issue the following commands:
- Discovery with a specific serial number
- POST to /a/sen with the reset command
To show all options:
reset_device -h
Configuration of an installation
KNX IoT Virtual Installation
There is an installation available for the following devices:
- KNX virtual Switching Actuator (serial number 00FA10010700)
- KNX virtual Push Button (serial number 00FA10010400)
Note this can be the GUI or the PI versions of the apps
The installation should be configured with:
- config_0.0.1.json for the Switching actuator device with serial number 00FA10010700
- config_0.0.2.json for the Push Button device serial number 00FA10010400
These files contain contents for:
- group object table
- entry in auth/at table (but is not used)
Installation is executed with the following commands:
# push button
./install_config.exe -sn 00FA10010400 -file config_0.0.2.json -ia 5
# switch actuator
./install_config.exe -sn 00FA10010700 -file config_0.0.1.json -ia 6
Note: both config files are manually created.
KNX IoT virtual installation with grpid
The installation should be configured with:
- config_0.0.1_grpid.json to the Switching actuator device with serial number 00FA10010700
- config_0.0.2_gripd.json to the Push Button device serial number 00FA10010400
These files contains contents for:
- group object table
- entry in auth/at table (but is not used)
- publisher table
- recipient table
The publisher and recepient tables contain the information for the group addresses to grpid mapping.
Installation is executed with the following commands:
# push button
./install_config.exe -sn 00FA10010400 -file config_0.0.2_grpid.json -ia 5
# switch actuator
./install_config.exe -sn 00FA10010700 -file config_0.0.1_gripid.json -ia 6
Note: both config files are manually created.
Test installation
The file test_server_config.json can be used for the KNX-IOT-STACK/apps/test_server_all program.